Jul 26, 2024 | 2024-2025 Annual Catalog, Christmas, In The Grove Bundle |
Hello!
I’m back! I was in Iowa visiting family. (I live in Pennsylvania.) It was nice to be back where I was raised. However, I’m happy to return to my craft room.
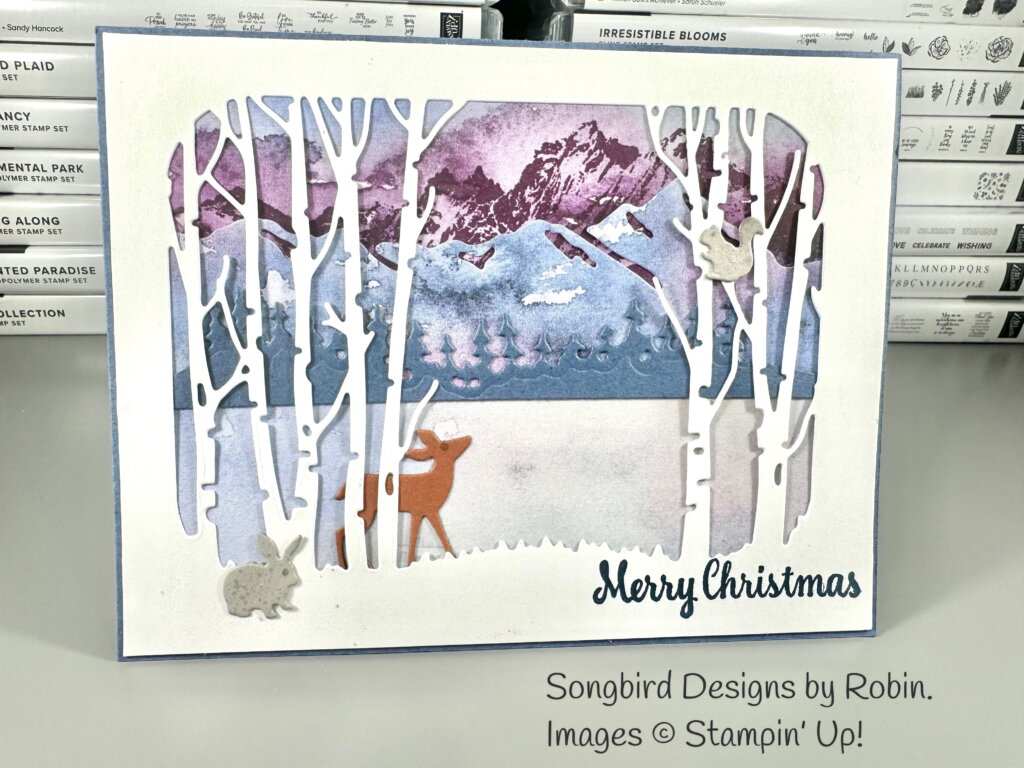
I did a Christmas in July theme for all my classes this month. I’d like to share one of the cards we made. I used the bundle, In The Grove. This stamp set is not a dedicated Christmas bundle, but I believe it makes a beautiful holiday card when used with the cool colors in the Thoughtful Journey Designer Series Paper. What do you think?

It really isn’t hard to put together and could be mass produced easily. There’s minimal stamping involved.
Here are the details

Materials needed
In the Grove Bundle
Grassy Grove Bundle (For deer die cut only)
Misty Moonlight Cardstock – 5 1/2in x 8 1/2in. scored at 4 1/2in., 1 1/2in. x 5in.
Basic White Cardstock – 4in. x 5 1/4in.
Thoughtful Journey Designers Series Paper 6×6 – Trim to 4in x 5 1/4 in. Keep the larger remainder piece for the die cut.
Gray Granite and Copper Clay Cardstock scraps for the critters.
Misty Moonlight Ink Pad
Blackberry Bliss Ink Pad
Process
* Trim the Designer Series Paper to 4 in. on the short side and 5 1/4in. on the long side. KEEP the remaining piece for the die cut.
* Place the Mountain Die at the top of the remaining DSP piece and die cut.

* Die cut the smaller Misty Moonlight piece with the tree outline die cut. Place the die at the top of the piece and die cut.
* Die cut the Basic White piece with the birch trees die.
* Die cut the adorable critters (Side note-I was going to use the fox stamp and die cut. When I was putting the animals on my card, Mr. Fox was staring hungrily at the poor bunny! That’s why I substituted the equally adorable deer.)
* Stamp the mountain stamp on the purple part of the DSP using the Blackberry Bliss Stamp pad.
* Stamp a sentiment on the bottom of the white die cut piece.
* Adhere the mountain die cut piece and then the tree line die cut piece.
* Place your deer and adhere.
*Adhere the white die cut piece and then adhere the bunny and squirrel.
* Adhere the finished piece horizontally to the front of the card base.
That does it! Thanks for stopping by!
Robin
Jul 19, 2023 | Annual Catalog 2022-2023, Stampincutandembossfolderanddies, Sympathy, Thinking of You |

Welcome to InKing Royalty’s July Blog Hop! We are embracing some (or all) of Stampin’ Up!’s beautiful blues for today’s hop – there are so many great ways to showcase the blues in the current color families! We are excited to share our creations and hope you love them! After you read my post, I hope hop over to the next person on the list at the base of this post.
I’m so glad to be singing the blues today with you. The two blues I chose to feature are Boho Blue and Night of Navy. Of course, I turned to the Countryside Inn Designer Series Paper for Inspiration.

I just love how these 2 blues work so well with one another! The card base is Night of Navy as well as the sentiment strip. The doily is made using the Delightful Doily Hybrid Embossing Folder. I embossed a 4×4 in. piece of Boho Blue from the 2023-2025 In Color Luster Specialty Paper. This paper just sparkles in a way you just can’t see from my photo. Take my word for it, you NEED this paper! I then used the coordinating die to cut my doily out. After running it through my die cut machine a couple of times, it turned out beautifully. I wanted a Night of Navy background so that the die cut doily would be more distinct. I took a 4×4 piece of Night of Navy and cut it with the outline die, then adhered it to the back of the Boho Blue Doily. I embossed the sentiment from Go To Greetings in white. I finished the card with 2 dots from the 2023-2025 In Color Dots.
Thank you for stopping by today. I hope you’ll hop along to the next stop on the blog hop, Sheryl Abernathy at Elegant Sentiments. There’s lots of inspiration to be found in this group – and you don’t want to miss it!
Have fun hopping!
Robin
Thank you for hopping along with us. If you get stuck during the Blog Hop, please use this line-up as a guide:
- Brian King at Stamp with Brian
- Jan Dufour at Stamp Me Silly
- Pam Morris at Tap Tap Stamp
- Jackie Beers at Blue Line Stamping
- Renae Novak at Blessed by Cards
- Sue Jackson at Just Peachy Stamping
- Robin Myren at Songbird Designs by Robin
- Sheryl Abernathy at Elegant Sentiments
Sep 21, 2022 | 2022 July-December Mini Catalog, Birthday, Blog Hops, Soft Seedling Stamp Set, Uncategorized |

Welcome to InKing Royalty’s September Blog Hop! This month’s blog hop is dedicated to leaves. As the weather begins to cool, the leaves begin to change colors and fall from the trees. We are excited to share our creations and hope you love them! After you read my post, I hope you’ll hop over to the next person on the list at the base of this post.
My card today uses the Spotlight Technique and the Baby Wipe Technique to show off my leaves today.
Here’s my card:

Soft Seedlings is one of my favorite stamp sets from the July-December Mini Catalog. Even though it has no coordinating dies, it’s very versatile. I’ll walk you through my process.
Materials
Soft Seedlings Stamp Set
Peaceful Moments Stamp Set
Cajun Craze Cardstock – 5 1/2 x 8 1/2 scored at 4 1/4, 3 1/4 x 3 1/4, 2 1/4 x 2 1/4
Basic White Cardstock – 2 pieces cut at 4 x 4 1/4 (one for the inside), 3 x 3, 2 x 2
Circle Dies
Merry Merlot, Cajun Craze, Crushed Curry and Mossy Meadow Reinkers
Brushed Metallic Adhesive-Backed Dots
Baby Wipes
Stamping Steps
*Stamp the leaf with Cajun Craze Ink on one of the large Basic White Cardstock Pieces.
*Prepare your baby wipe stamp pad by folding a couple of wipes. Add drops of color from the reinkers onto the baby wipes. Tip: I like to set my wipes on a Silicone Craft Sheet. It’s easy to clean and gives the wipes a bit of a cushion.
*Press the leaf stamp into the baby wipes and then stamp onto the 3×3 Basic White Cardstock. Repeat the process with the sentiment, stamping on the 2 x 2 piece of Basic White.
*Die cut the 2 stamped images using the circle dies. Die cut the Cajun Craze cardstock pieces with the circle dies. Adhere the stamped images to the coordinating Cajun Craze circles.
*Adhere the finished leaf piece on top of the part of the front panel that you are “spotlighting” (covering up). Adhere the sentiment to the upper right side of the front panel. Trim the circles so they fit don’t hang over the panel.
*Adhere the finished panel to the front of the card base.
*Add 3 of the Metallic Dots to the card front.
I thought it turned out beautifully and I hope you do too! Thank you for stopping by today. I hope you’ll hop along to the next stop on the blog hop, Candy Ford at Stamp Candy. There’s lots of inspiration to be found in this group – and you don’t want to miss it!
Enjoy the hop!
Robin
Thank you for hopping along with us. If you get stuck during the Blog Hop, please use this line-up as a guide:
- Brian King at Stamp with Brian
- Sue Jackson at Just Peachy Stamping
- Lynn Kolcun at Avery’s Owlery
- Jackie Beers at Blue Line Stamping
- Jan Dufour at Stamp Me Silly
- Marilyn Jones at Stamp with MJ
- Renae Novak at Blessed by Cards
- Jessica Atchison at Stampin with the Atchisons
- Katie Ferguson at Cottage Paper
- Ann Murray at Murray Stamps Ink
- Robin Myren at Songbird Designs by Robin
- Candy Ford at Stamp Candy
- Pam Morris at Tap Tap Stamp
Feb 16, 2022 | 2022 January-June Mini Catalog, Birthday, Blessings of Home Bundle, Heart and Home Suite, Occasions, Uncategorized |

Welcome to InKing Royalty’s February Blog Hop! This is a great time of year to build your stash of handmade birthday cards, so we are sharing birthday-themed projects with you today. We are excited to share our creations and hope you love them! After you read my post, I hope you’ll hop over to the next person on the list at the base of this post.
I’ve been busier than usual this month so my card is quick, simple, and easy to reproduce. I made my card using the Blessings of Home Bundle and the coordinating Heart & Home Memories & Home Card Pack. The card bases and envelopes are versatile enough for guy or gal cards.

Supplies
Card Base and Envelope-These cards are a bit larger than an A2 card.
White Frayed Ribbon
Misty Moonlight Cardstock and Ink Pad
Basic White Cardstock
Classic Matte Dots
Harvest Dies
VersaMark Ink Pad
White embossing powder
Heat tool
Dimensionals
Tear and Tape
Stampin ‘ Cut and Emboss Machine
Process
1. Stamp the large flower stamp from the Blessings of Home Stamp Set on a piece of Misty Moonlight Cardstock with VersaMark ink.
2. Sprinkle the cardstock with white embossing powder, tap off the extra and set with the heat tool.
3. Die cut the finished piece using the coordinating die from the bundle and the Stampin’ Cut and Emboss Machine.
3. Cut a 5 1/2 in. piece of the Frayed Ribbon and attach to the card front with Tear and Tape.
4. Adhere the die cut piece using Dimensionals.
5. Stamp the sentiment on a piece of Basic White Cardstock with Misty Moonlight Ink.
6. Die cut the sentiment using the die from the Harvest Dies.
7. Adhere to the card front.
8. Embellish the finished card front with a sprinkling of Classic Matte Dots.
Thank you for stopping by today. I hope you’ll hop along to the next stop on the blog hop, Candy Ford at Stamp Candy
Hugs!
Robin
Thank you for hopping along with us. If you get stuck during the Blog Hop, please use this line-up as a guide:
- Brian King at Stamp with Brian
- Lynn Kolcun at Avery’s Owlery
- Pam Morris at Tap Tap Stamp
- Jan Dufour at Stamp Me Silly
- Sheryl Abernathy at Elegant Sentiments
- Renae Novak at Blessed by Cards
- Sue Jackson at Just Peachy Stamping
- Jackie Beers at Blue Line Stamping
- Lisa Graham at Lisa’s Little Ink Spots
- Joanne Wittington at The Inky Dragon
- Robin Myren at Songbird Designs by Robin
- Candy Ford at Stamp Candy
- Marilyn Jones at Stamp with MJ
Aug 18, 2021 | Beauty of the Earth Suite, Beauty of the Earth Suite, Occasions, Thinking of You |

Welcome to InKing Royalty’s August Blog Hop! During this year’s blog hops, we are having fun with our stamping favorites – our favorite themes for seasonal cards and projects. This month’s projects feature leaves and trees, so you are likely to find lots of inspiration for Autumn. We are excited to share our creations with you today! After you read my post, I hope you’ll hop over to the next person on the list at the base of this post.
My card for today features the Beauty of the Earth Suite on page 10, and the Gold Leafing on Page 143 of the Annual Catalog . The card features a Tent Fold. I learned this fold from Lisa Curcio. Here’s the link to her tutorial https://youtu.be/VL3EHNSYHag
Here’s my version:

Here’s the details:
- The card base is Merry Merlot with a window cut from the front. A window sheet is adhered behind the window.
- The Designer Series Paper has added flecks of Gilded Leafing. I first added dots of glue using a glue pen. Next I dipped the DSP into the Gilded Leafing. I used a stipple brush to remove the excess. It’s really fun to use but a bit messy. Those little gold flakes want to go everywhere!
- Adhere the DSP to the inside panel.
- I stamped the tree branch with Soft Suede ink. I 2-step stamped the foliage using Merry Merlot and Night of Navy inks, stamping off once when I stamped the Navy.
- I used my glue pen again to add glue to foliage part of the tree. I then repeated the Gilded Leafing process. So pretty!
- I die cut the tree trunk and foliage. I adhered the 2 tree pieces together and added them to the front of the card.
- I stamped the sentiment in Night of Navy and added it to the card front. What is usually the inside of the card is on the back of this one. Here’s what it looks like.

- I repeated the tree stamping process on this tree but used the smaller foliage pieces included in the stamp set.
- The sentiment is stamped in Night of Navy. It’s from the Through It Together stamp set found on page 72 of the Annual Catalog.
Thank you for stopping by today. I hope you’ll hop along to the next stop on the blog hop, Sheryl Abernathy at Elegant Sentiments. There’s lots of inspiration to be found in this group – and you don’t want to miss it!
Paper hugs!
Robin
Thank you for hopping along with us. If you get stuck during the Blog Hop, please use this line-up as a guide:
- Brian King at Stamp with Brian
- Lynn Kolcun at Avery’s Owlery
- Renae Novak at Blessed by Cards
- Jackie Beers at Blue Line Stamping
- Sue Jackson at Just Peachy Stamping
- Robin Myren at Songbird Designs by Robin
- Sheryl Abernathy at Elegant Sentiments
- Lisa Graham at Lisa’s Little Ink Spots
- Sheryl Sharp at Sharp Notes by Sheryl
- Joanne Brown at The Inky Dragon
- Candy Ford at Stamp Candy
Nov 18, 2020 | 2020 August-December Mini Catalog, August-December 2020 Mini Catalog, Christmas, Poinsettia Petals Bundle |

Welcome to InKing Royalty’s November Blog Hop! During this year’s blog hops, we are enjoying a year of celebrations. This month’s projects celebrate Christmas, which – believe it or not – is just around the corner. Please prepare yourself for lots of beautiful projects that share the joy of this holiday. We are excited to share our creations with you today! After you read my post, I hope you’ll hop over to the next person on the list at the base of this post.
There are so many beautiful bundles in this year’s August-December Mini-Catalog, but my favorite is the Poinsettia Petals Bundle. Here is my card featuring this gorgeous bundle:

Here are the details:
- The poinsettia is stamped in VersaMark on Petal Pink Cardstock and then embossed with white embossing powder.
- The berries are stamped in VersaMark on Mint Macaron Cardstock and then embossed with white embossing powder.
- The sentiment is stamped in Soft Suede ink.
- The center is three of the Wonderful Gems.
- The background is done on Watercolor Paper. I saturated the top 2/3rds of the piece with my Water Painter. I then did a watercolor wash using Pool Party ink. A used my stamp pad lid as my palette. Finally, I ground sea salt over the top of it and let it dry. After drying, I wiped off the excess salt. I love the way it turned out! I hope you do too!
Thank you for stopping by today. I hope you’ll hop along to the next stop on the blog hop, Brian King at Stamp With Brian. There’s lots of inspiration to be found in this group – and you don’t want to miss it!
Hugs!
Robin
Thank you for hopping along with us. If you get stuck during the Blog Hop, please use this line-up as a guide:
- Brian King at Stamp with Brian
- Ann Murray at Murray Stamps Ink
- Candy Ford at Stamp Candy
- Sheryl Sharp at Sharp Notes by Sheryl
- Julie DiMatteo at The Paper Pixie
- Rachel Brumley at Artistic Designs by Rachel
- Jackie Beers at Blue Line Stamping
- Sue Jackson at Just Peachy Stamping
- Joanne Brown at The Inky Dragon
- Lynn Kolcun at Avery’s Owlery
- Pam Morris at Tap Tap Stamp
- Renae Novak at Blessed by Cards
- Linda Krueger at The Stamp Coach
- Shawn de Oliveira at Shawn Stamps
- Robin Myren at Songbird Designs by Robin